FEFLOW (Finite Element subsurface FLOW simulation system) is a computer program for groundwater modelling. This guide presents one method of installing and running FEFLOW 6.2 on the Amazon Web Services (AWS) Elastic Compute Cloud (EC2) service.
1 Assumptions
1.1 Requirements
1.1.1 Installed Software Packages
- PuTTY SSH (or other SSH application)
- PuTTY Key Generator
- WinSCP
1.1.2 Accounts
It is assumed that you have an Amazon AWS account.
1.1.3 Preparation
Save the following script as feflow_install_ubuntu.sh:
#!/bin/bash

ZIP="feflow_ubuntu.zip"

echo -e "\nStarting up...\n\n"

dpkg -s figlet &> /dev/null || sudo apt-get -qq install figlet &> /dev/null
dpkg -s boxes &> /dev/null || sudo apt-get -qq install boxes &> /dev/null

figlet -f standard "FEFLOW 6.2 INSTALLER"
echo -e "FEFLOW 6.2 Installer for Ubuntu [V 1.0.4]\nWritten by: Richard Bruneau, 2016" | boxes -d shell -p a1l6r6

echo -n -e "\nThis will install FEFLOW 6.2 on Ubuntu 14.04 (64-bit)\n\nOptions:\n1: Install FEFLOW without examples.\n2: Install FEFLOW with examples.\n3: Cancel.\n\nEnter (1/2/3): "
read text

if [ "$text" = "1" ] || [ "$text" = "2" ]; then

	if [ -f "$ZIP" ]; then

		echo -e "\nInstalling...\n\n"

		dpkg -s unzip &> /dev/null || sudo apt-get -qq install unzip &> /dev/null

		#unzip feflow_ubuntu.zip -d FEFLOW_6.2
		unzip $ZIP -d FEFLOW_6.2
		cd FEFLOW_6.2

		sudo dpkg -i wasy-core_5.1-3_amd64.deb
		sudo apt-get -f install

		sudo dpkg -i wasy-qt_4.8-6_amd64.deb
		sudo apt-get -f install

		sudo dpkg -i wasy-feflow_6.2-6_amd64.deb
		sudo apt-get -f install

		if [ "$text" = "2" ]; then
			sudo dpkg -i wasy-feflow-examples_6.2-0_all.deb
			sudo apt-get -f install
		fi

		echo "/opt/wasy/lib64" | sudo tee -a /etc/ld.so.conf

		sudo dpkg -i libgomp1_4.6.3-1ubuntu5_amd64.deb
		sudo apt-get -y -f install

		#remove region
		sudo sed -i 's/us-east-1\.ec2\.//g' /etc/apt/sources.list
		sudo apt-get update
		sudo apt-get install -y awscli

		#sudo apt-get install -y gcc-4.6-base

		sudo apt-get install -y libsm6

		sudo apt-get install -y libxrender1

		sudo apt-get install -y libfontconfig1

		sudo apt-get install -y libgl1-mesa-glx libgl1-mesa-dev

		sudo apt-get install -y libglu1

		sudo ldconfig

		echo -e "\nInstallation Complete.\n"

	else
		echo -e "\n$ZIP not found. Cancelling installation.\n"
	fi

else
    echo -e "\nFEFLOW will not install. Exiting.\n"
fi
Save the following script as feflow_run.sh:
#!/bin/bash

if [ $# -eq 0 ]; then

echo -e "No input provided. Please provide a filename for a model. The form is: bash ./feflow_run.sh <file.FEM>"

else

	echo -n -e "\nThis will run the FEFLOW model "$1". Continue? (y/n): "
	read text

	if [ "$text" = "y" ]; then

		cd ~

		dir=$1"-results-"$(date +"%s")

		echo -e "\nThe following directory was created:\n"
		echo -e "$dir\n"

		mkdir $dir

		sudo /opt/wasy/bin/feflow6206c -demo -dac ~/$dir/output.dac -log ~/$dir/errors.txt $1

		echo -e "\nDone processing.\n"

	else
		echo -e "\nThe model will not be run. Exiting.\n"
	fi

fi
Download the following files and place them in a ZIP archive named feflow_ubuntu.zip. Most can be found at the DHI website:
- libgomp1_4.6.3-1ubuntu5_amd64.deb
- wasy-core_5.1-3_amd64.deb
- wasy-feflow_6.2-6_amd64.deb
- wasy-feflow-examples_6.2-0_all.deb
- wasy-qt_4.8-6_amd64.deb
2 Launching An EC2 Instance
2.1 Launching
2.1.1 Launch Via The AWS Console
Having logged into AWS, start at the main console (Figure 2.1). Click EC2.
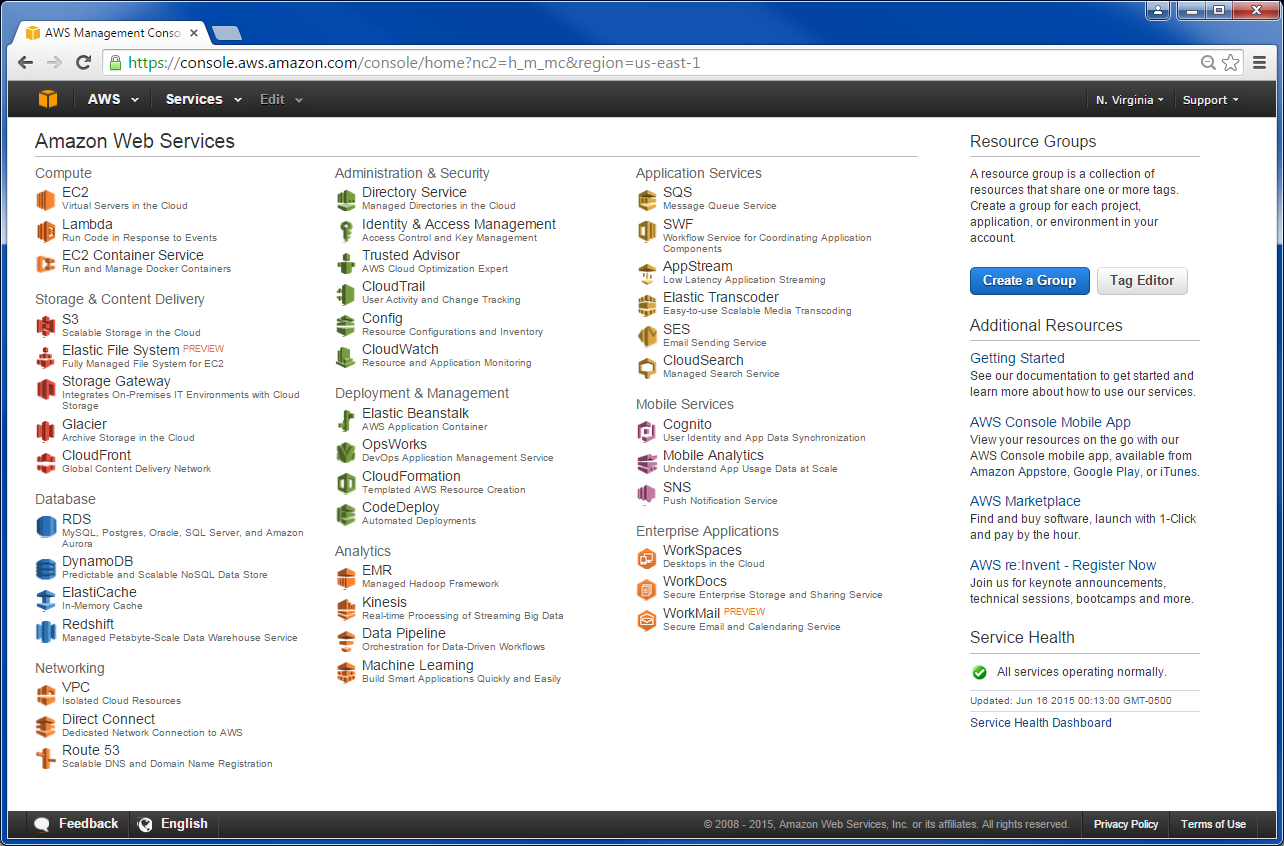
Figure 2.1 AWS Management Console.
Click Launch Instance to begin the process of launching an instance. First, choose a machine image. In terms of virtualization type, HVM (hardware virtual machine) is preferred to PV (paravirtualization). This guide will assume that Ubuntu Server 14.04 LTS (HVM), SSD Volume Type is chosen. Click Select for the appropriate machine image.
Next, choose an instance type. For FEFLOW, the best types of instances are at the bottom. For example, the r3.8xlarge machine type is likely to be ideal for FEFLOW. Click Next: Configure Instance Details (see below, Figure 2.2).
Enter the number of instances that you want to start – each instance is a separate virtual machine and the costs per hour are multiplied by the number of instances. In this guide, one is selected. For the network, select the first VPC option. Select the first subnet option. The rest of the options can be ignored for now. Click Next: Add Storage.
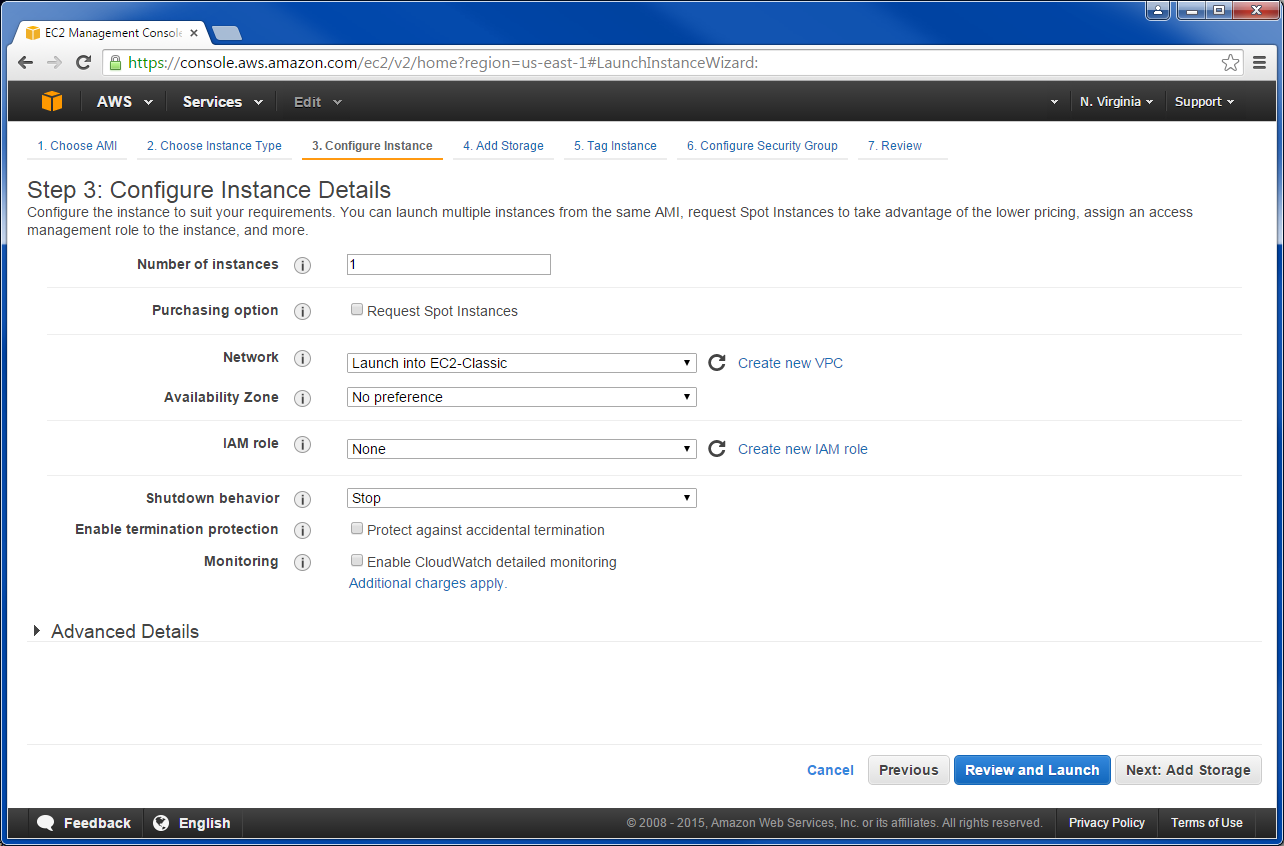
Figure 2.2 Instance Details
There are essentially two types of storage: EBS and instance store. The root volume (i.e. where the files for the operating system are stored) for most AMIs is backed by Elastic Block Store (EBS).
Amazon says of EBS volumes:
An Amazon EBS volume is a durable, block-level storage device that you can attach to a single EC2 instance. You can use EBS volumes as primary storage for data that requires frequent updates, such as the system drive for an instance or storage for a database application. EBS volumes persist independently from the running life of an EC2 instance. After a volume is attached to an instance, you can use it like any other physical hard drive.
For more about EBS volumes, please refer to the AWS documentation here: http://docs.aws.amazon.com/AWSEC2/latest/UserGuide/EBSVolumes.html
And of instance stores:
An instance store provides temporary block-level storage for your instance. This storage is located on disks that are physically attached to the host computer. Instance store is ideal for temporary storage of information that changes frequently, such as buffers, caches, scratch data, and other temporary content, or for data that is replicated across a fleet of instances, such as a load-balanced pool of web servers. An instance store consists of one or more instance store volumes exposed as block devices. The size of an instance store varies by instance type.
For more about instance stores, please refer to the AWS documentation here: http://docs.aws. amazon.com/AWSEC2/latest/UserGuide/InstanceStorage.html
For the r3.8xlarge, there are two 320GB SSDs (instance stores) associated with that EC2 instance type (the size of the instance store is listed with each instance type). These are instance store volumes, and are considered ephemeral in the sense that once the EC2 instance is stopped or terminated (or the physical disk itself fails), whatever is on them disappears. In contrast, the EBS volumes attached to an instance can continue on indefinitely (and can also be attached and reattached to different instances).
In the case of FEFLOW, simply expanding the root volume to a large enough size will do. 8GB is the default for the root volume for Ubuntu 14.04 – you can make it 100GB in order to handle the larger files that FEFLOW generates. The maximum size of an EBS volume is 17.5 TB. Another possibility is to leave the root volume alone (i.e. leave it at the default 8GB and with Delete on Termination checked) and create a separate EBS volume with Delete on Termination unchecked and at an appropriate size for the expected output of a particular FEFLOW model (or, large enough to deal with any FEFLOW output). A screenshot of the latter setup is below (Figure 2.3).
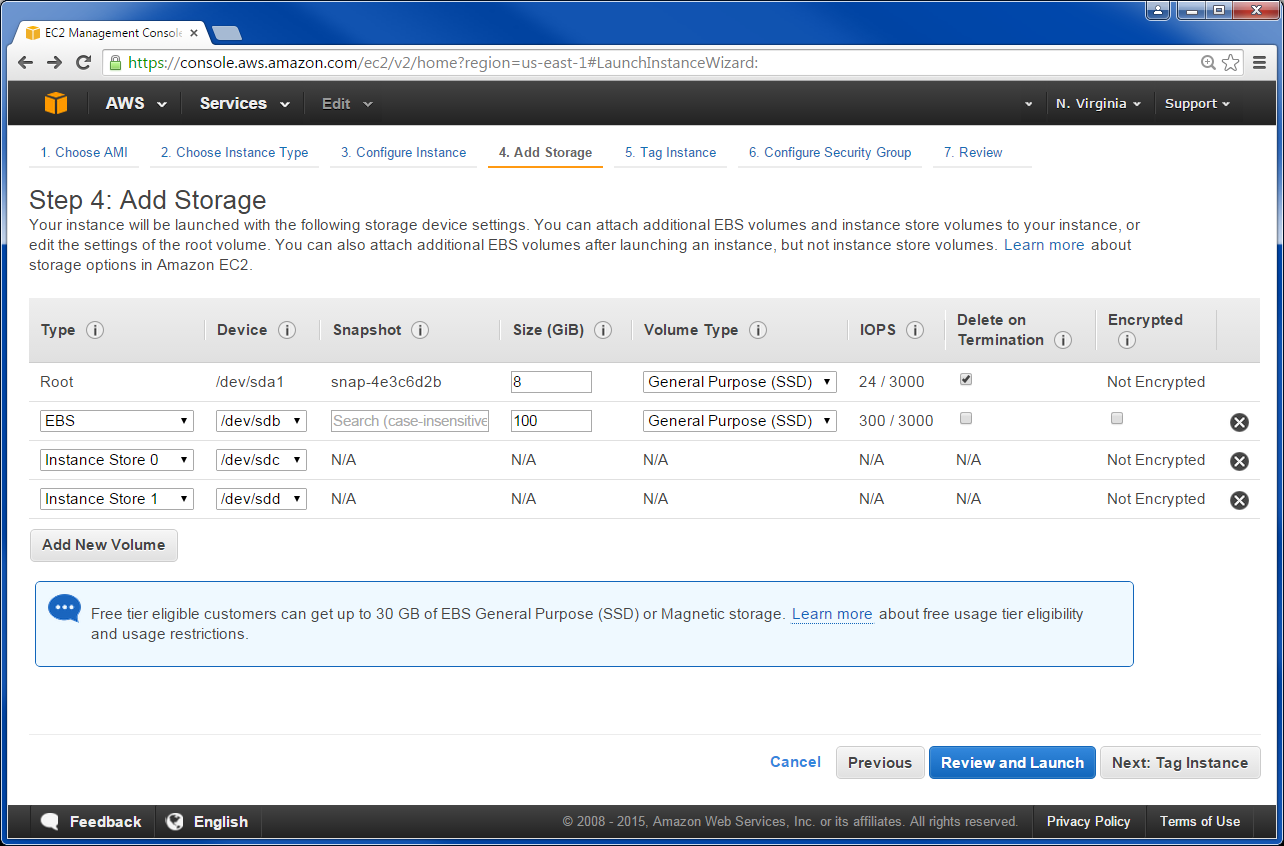
Figure 2.3 A possible storage configuration.
Once you have configured storage, click Next: Tag Instance.
For the purposes of short term usage, setting tags can still be useful. For example, if you are running multiple instances (with multiple models), it is a good idea to identify which instance is running a particular model. If you are running only one instance at any particular time, naming an instance doesn’t provide much benefit. You can have up to 10 tags. More information on tags can be found in the AWS documentation here: http://docs.aws.amazon.com/AWSEC2/latest/ UserGuide/Using_Tags.html.
Once you have the tags entered, click Next: Configure Security Group.
If you are starting an instance for the first time, ensure that Create a new security group is selected. Under Type select All Traffic. Under Source select My IP. Since you are the only one who is using this EC2 instance, this will ensure the best security (i.e. only you can connect to it).
Click Review and Launch.
Ensure everything is correct, then click Launch. You will be presented with a modal window to either create or select a key pair. Select Create a new key pair from the dropdown list. Then, type in a name for the key pair. Click Download Key Pair. The keys will be downloaded to your computer as a CSV file (open the file to view them). Be sure to keep the file in a secure location.
2.1.2 Key Generation
Open PuTTY Key Generator (See Figure 2.4). Click Load.
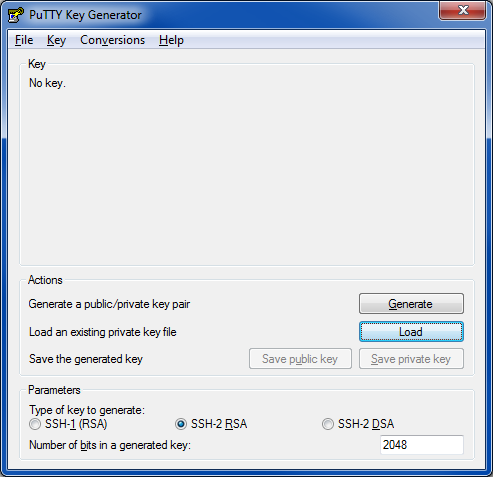
Figure 2.4 The PuTTY Key Generator
Navigate to and open the key file (<name>.PEM). You will get a dialog box saying that you’ve successfully imported the foreign key. Click Ok. Click Save private key. Click Yes on the warning dialog box that opens. Enter a name for the key and click Save. Close PuTTY Key Generator.
Go back to the AWS Console and click Launch Instances.
2.2 Connecting
Open PuTTY (See Figure 2.5). The program will start in the Session section.
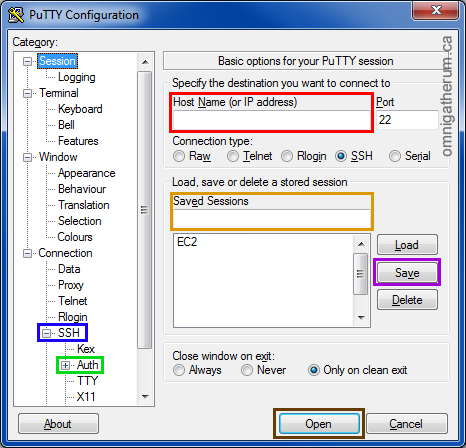
Figure 2.5 The PuTTY interface, with highlights
Type in the user name and the public DNS name for the server in the field labelled Host Name (or IP address) (the red box in Figure 2.5). The pattern is <username>@<public dns> (e.g. ubuntu@ec2-52-6-49-102.compute-1.amazonaws.com). For Ubuntu, the username is “ubuntu” by default. The public DNS address can be found in the AWS Console under the Instances section (see Figure 2.6, below). Ensure that the connection type is SSH and that the port is 22. Once the host name is entered (i.e. the user name and public DNS combination), expand the SSH category (the blue box in Figure 2.5), then click the Auth category (the green box in Figure 2.5). At the bottom, click Browse…. Navigate to the key (<name>.PPK) and open it. Once that is done, on the left-hand menu click Session. For the Saved Sessions field (the orange box in Figure 2.5), enter a name for the session details. Click Save (the purple box in Figure 2.5) to save to the session details. To connect to the server, click Open (the brown box in Figure 2.5).
If a warning box appears (i.e. “PuTTY Security Alert”), simply click Yes.
Once the connection is opened, you will be presented with a command line interface with the EC2 instance (as in Figure 2.7, below).
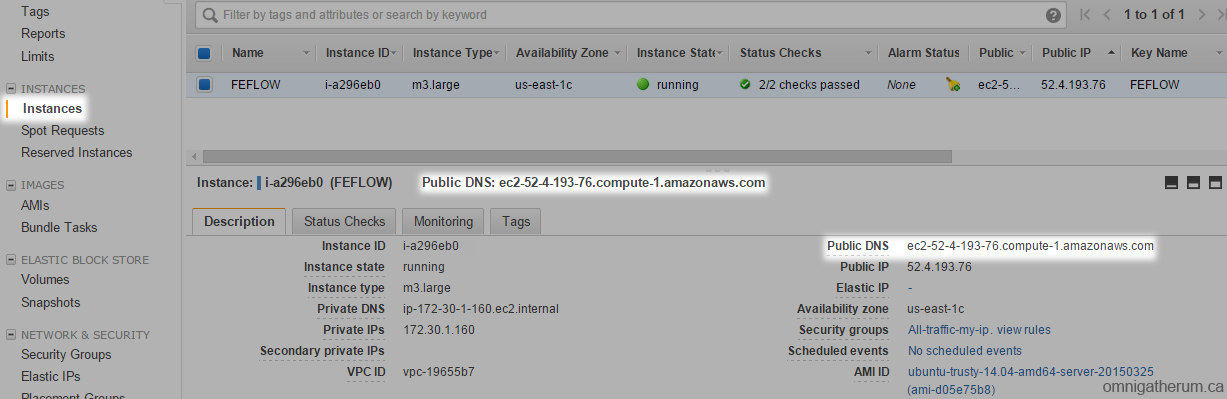
Figure 2.6 The location of the Public DNS address in the AWS Console
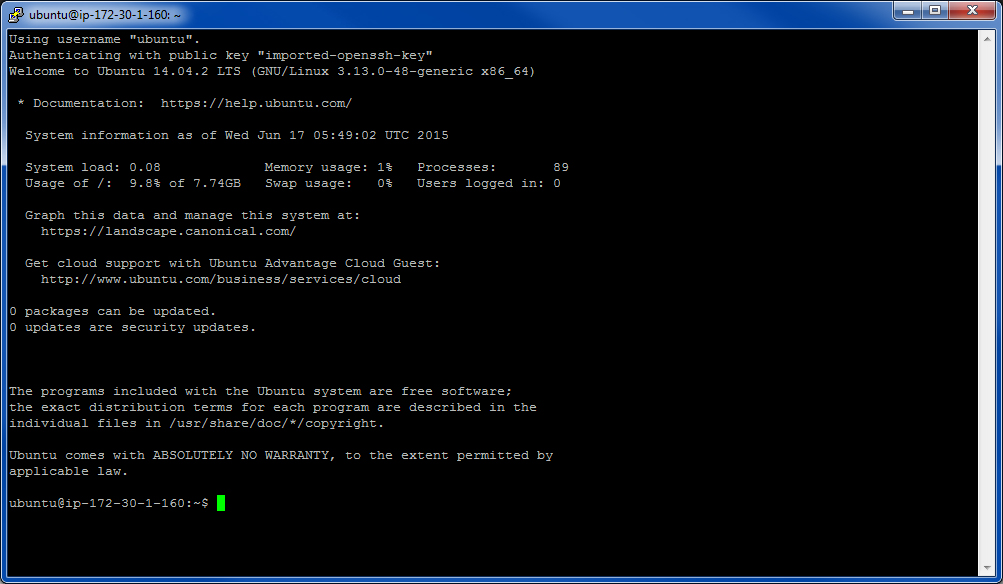
Figure 2.7 The command line interface with the EC2 instance
3 Installing FEFLOW
In the PuTTY SSH console, ensure that you are starting in the home directory by typing:
cd ~
Start up WinSCP. WinSCP can import saved sessions from PuTTY. In WinSCP (at startup), at the bottom, click Tools, then Import Sites. Then select the one saved earlier (in PuTTY) and click Ok. The details will all be filled in. Click Login.
On the left-hand side is your computer (red and green boxes in Figure 3.1); on the righthand side is the EC2 instance that you’ve connected to (blue and orange boxes in Figure 3.1). Click the address bar on the left (red box in Figure 3.1) to navigate to the location of the FEFLOW installation archive and the FEFLOW installer script. You can copy and paste the address into the box labelled Open directory: or, you can click Browse. Click Ok once the folder has been selected. Ensure that the EC2 instance is in the home directory – it should be /home/ubuntu (as in the blue box in Figure 3.1).
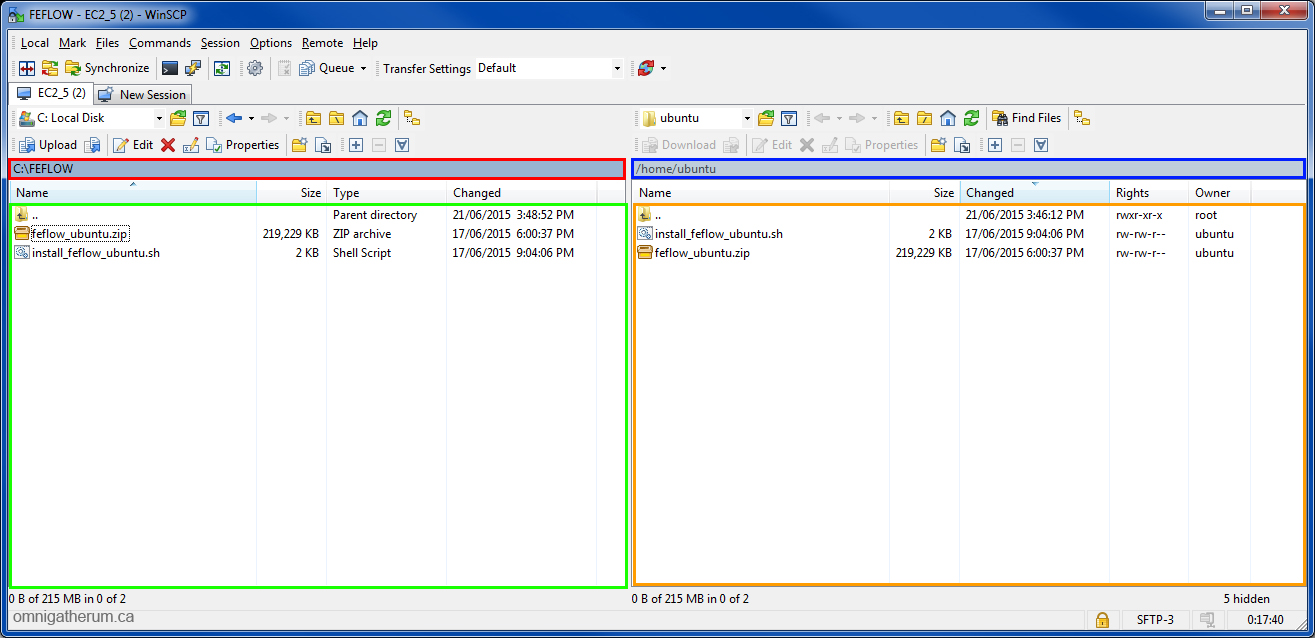
Figure 3.1 The WinSCP interface
Copy the feflow_ubuntu.zip archive and the feflow_install_ubuntu.sh script from your machine to the EC2 instance by highlighting them and dragging them to the right-hand side. Having placed the installer script in the EC2 instance home directory along with .zip archive, run the installer script with the following commands. Follow the directions of the script.
Switching to the PuTTY SSH console, enable execution of the script by typing:
chmod +x feflow_install_ubuntu.sh
Run the script by typing:
bash ./feflow_install_ubuntu.sh
4 Uploading And Running A FEFLOW Model
4.1 Running FEFLOW
With WinSCP running, transfer the .FEM model file and the feflow_run.sh script to the home directory of the EC2 instance (this should be /home/ubuntu, as before).
In the PuTTY SSH console, ensure that you are starting in the home directory by typing:
cd ~
Enable execution of the script by typing:
chmod +x ./feflow_run.sh
Run the script by typing:
bash ./feflow_run.sh <filename>.fem
The command above should have <filename>.fem replaced by the name of the model file with the .FEM extension, for example: recharge_times.fem. If no filename is provided, the script will simply generate an error.
Once the script executes, it will ask you to confirm whether you want to run the model. Type “y” to confirm, or “n” to cancel.
The script creates a folder in the format of: <filename>.fem-results-<unixtime>
Once FEFLOW is done processing, a message will show up in the console indicating such. The folder created by the script will contain the output as output.dac and any errors generated written to the file errors.txt.
Following execution, the files can be downloaded.
4.2 Downloading The Output
Downloading the output file(s) can be done in a few ways.
The first is simply transferring the file(s) from the EC2 instance using WinSCP. For smaller files, this will work fine (e.g. a few GB), but quickly becomes expensive for larger files due to costs of exporting data as well as running the instance at the same time.
The second is transferring them to S3 for download. This takes a bit more time overall, since the files have to be transfered from the EC2 instance to S3, but it will cost less.
The third is using AWS Import/Export for very large amounts of data. A storage device is sent to Amazon and the specified data is transfered to the device and mailed back.
You can use the AWS cost calculator to compare the suitability of downloading via EC2, S3, and Amazon Import/Export here: http://calculator.s3.amazonaws.com/index.html
4.2.1 First Method
With WinSCP open, transfer the output.dac file from the EC2 instance to the local computer. Optionally, the errors.txt file can also be transferred. WinSCP will give an estimation as to how long the download will take.
4.2.2 Second Method
Starting in the AWS main console (as in 2.1), click S3 under “Storage & Content Delivery.” Click Create Bucket. A modal window will open. Type a name for the bucket in the Bucket Name text field. Name the bucket in such a way that will be descriptive but also short enough to facilitate typing it in commands. You will also need to ensure that the bucket name is unique across Amazon S3 – a good way to ensure that is to preface the folder name with a unique identifier (e.g. a random string of characters and your name or the company’s name). Select a region for the S3 bucket to be created in. This guide will assume that “US Standard” is the chosen region (the “US Standard Region” for S3 matches up with the “Northern Virginia Region” for EC2). Click Create. You will then see an interface with bucket you just created highlighted.
Next, in the AWS main console, click your name at the top right-hand corner, then click Security Credentials on the dropdown menu that appears. If a modal window is displayed, click Continue to Security Credentials. On the left-hand menu, click Users. At the top, click Create New Users. Enter at least one name for one account. You only need one for this guide. Once you click Create, the account(s) will be created. You must download the credentials by clicking Download Credentials (the secret access key is only shown once). You can also click Show User Security Credentials and copy them to the PuTTY SSH console for the later step (they are the “Access Key ID” and the “Secret Access Key”). Click Close to be taken back to the Users interface.
While still in Security Credentials, click Policies on the left-hand menu. In the list of policy names, check off AmazonS3FullAccess. Click the Policy Actions dropdown at the top. On the dropdown menu, click Attach. Check off the name of the IAM user created earlier. At the bottom, click Attach Policy.
In the PuTTY SSH console of a running EC2 instance, ensure that you are starting in the home directory by typing:
cd ~
To configure the awscli package (installed via the installation script earlier), type:
aws configure
For “AWS Access Key ID” copy and paste in the “Access Key ID”, then hit Enter.
For “AWS Secret Access Key” copy and paste in the “Secret Access Key”, then hit Enter.
For “Default region name” type in “us-east-1”, then hit Enter.
For “Default output format” type in “text”, then hit Enter.
Use the following command to view the folders in the home directory:
ls
Once you know the name of the folder where the results are stored, you can type:
cd <foldername>
Where <foldername> is the name of the folder. To transfer the output.dac file to the S3 bucket created earlier, type:
aws s3 cp output.dac s3://<bucket>/output.dac --region us-east-1
Where <bucket> is the name of the bucket created earlier. The breakdown for the above command is:
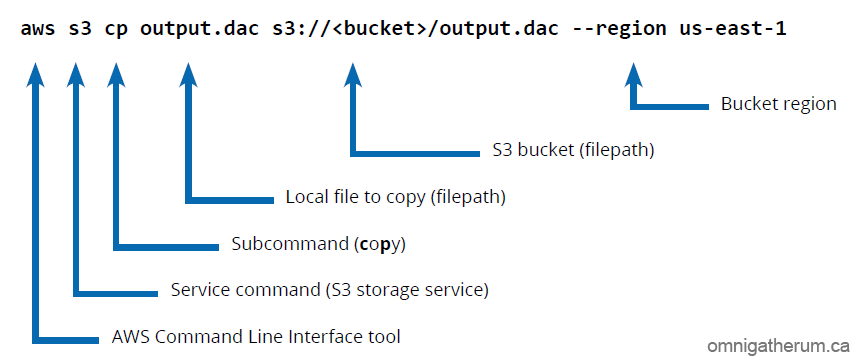
AWS command breakdown
If the command is successful, the console will print out: upload: ./output.dac to s3://<bucket>/output.dac
Otherwise, it will print “upload failed” and provide some description of the error.
The file that was copied is now in S3, and available for download from it.
Go to the S3 console (via the main console, as before) and click the name of the bucket that the file was transferred to. The file that was copied will be listed there. Click the checkbox next to the name of the file (e.g. output.dac), then click Actions above. Click Download on the dropdown menu that appears. A modal window will appear. Follow the instructions given.
4.2.3 Third Method
Amazon says of AWS Import/Export:
AWS Import/Export accelerates moving large amounts of data into and out of the AWS cloud using portable storage devices for transport. AWS Import/Export transfers your data directly onto and off of storage devices using Amazon’s high-speed internal network and bypassing the Internet. For significant data sets, AWS Import/Export is often faster than Internet transfer and more cost effective than upgrading your connectivity.
Please see http://aws.amazon.com/importexport/ for details on that particular service.
5 Shutting Down An EC2 Instance
Just like launching an instance, start at the main console. Click EC2. On the right-hand menu, click Instances. Select the instance that you wish to shut down by checking the box to the left of the Name field. Above, click Actions to open a dropdown menu. Hover over Instance State to open another menu. Click Terminate (in the red box, see Figure 5.1) to permanently shut down the selected EC2 instance. AWS will begin the process of shutting the instance down (status updates may appear indicating what is going on). PuTTY and WinSCP will both generate dialog boxes indicating that the connection to the server was closed. Click Close or Cancel depending on the program.
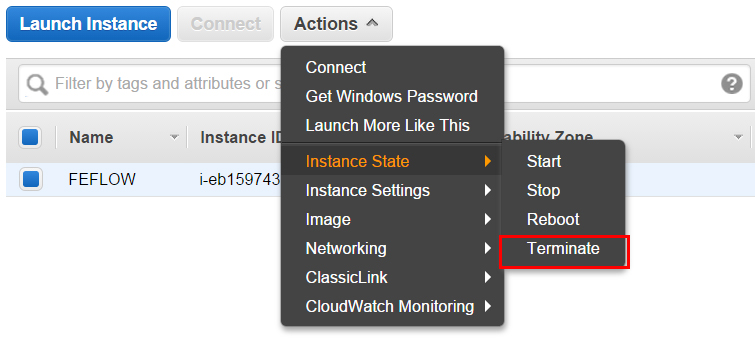
Figure 5.1 The Actions menu